Python "Light Dancing"
Re-purposing Motion Capture Data
March 14th, 2016
Project Overview
This is a project from class VSFX 705 - Programming Concept for VSFX.
In this project, I have learned how to use motion capture data which is normally used to achieve realistic character motion to generate the 3D animation. Using Pixar's custom Mel procedures to generate the geometry during render-time. So that we can keep the size of scene file as small as possible when we create them. When the motion capture data have been got, we can place objects or using the position information to create an interested scene.
Inspiration
My inspiration is lighting dance performances. When I was a freshman, that is my first time to watch lighting dance on a TV show and it impresses me. So when I got this project, I decided to imitate the lighting dance performance. "Dancers live in light as fish live in water. The stage space in which they move is their aquarium, their portion of the sea. Within translucent walls and above the stage floor, the lighting supports their flashing buoyance or their arrested sculptural bodies." ----Jean Rosenthal, a lighting dance lecturer.


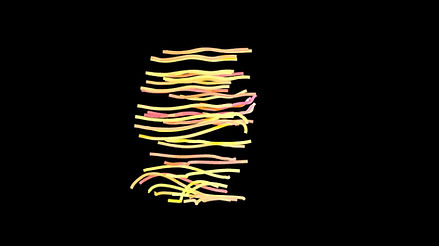
Final Render Images
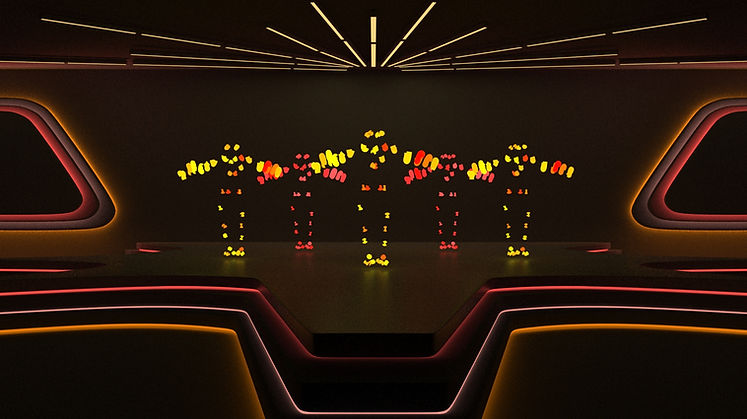
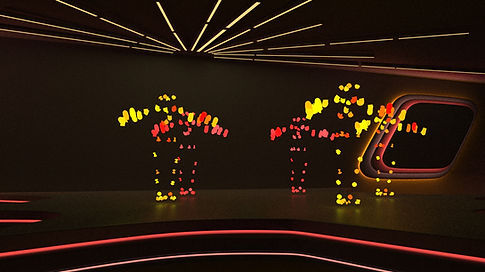

Dance Animation
User Interface

* MoCap Data File: Read the .txt file which content the
motion capture data;
* Render As: Different geometry types render setting;
* MoCap Scaling: Change the size of dancer;
* Geometry Size: Change the size of each geometry;
* Trail: Decide the number of frames behind the
geometry;
* Step Size: Decide the size of each step;
Settings and Results

Render As: Points

Render As: Curves

Render As: Blobby Surface

MoCap Scaling: 0.005

Geometry Size: 0.2

Trail: 50

Step Size: 1

MoCap Scaling: 0.01

Geometry Size: 1.5

Trail: 200

Step Size: 10
Shading: Color By ID
Put the random color onto the dancer using color by ID, You need to first get the ID of each geometry.
Adding this code into your python script:
Then assign "PxrDisney" material onto your object and connect to "CutrColorByObjectID " node with the color.


The Results:

Setting Up Project
Step1: Put following script files into ../maya/projects/RfM_python/ directory;
mocap_rman.py
Step2: Put following script files into ../maya/scripts/ directory;
mocap_db.py maya_proj_utils.py
Step3: Put following script files into ..maya/projects/RfM_mel/ directory;
mocap.rman mocapUI.mel mocapRI.mel
Step4: Choose and download some motion capture data .txt file from the internet. Such as:
http://accad.osu.edu/research/mocap/mocap_data.htm
Step5: Open Maya and set project;
Step6: Create a geometry, any kind geometry;
Step7: Select the geometry and run MEL command"mocapUI(); " in the script editor;
Step8: Keep the target geometry selected, and go to shading group tab in the right side of
Maya UI and find the "Extra RenderMan Attributes" tab;
Step9: Select the .txt file you downloaded, and set up the numbers;
Step10: Render the scene;
Note: If you want to preview the position of your dancer, you can follow the steps below:
Step1: Go to the render setting, and set the sampling lower;
Step2: Batch render the scene. Don't care about the quality of those sequences, we just want the rib files of each frame;
Step3: Once you get all the rib file you want, go to the menu-> RenderMan -> RIB Archive -> create node. Then you will get this UI:

step4: After your batch render, it will auto generate a folder on your Maya project directory
named "RIB_Archive".The rib files we need will generate in the folder named your
scene name under this folder;
Step5: Select the rib files you generated on the Archive browser, and set up the start frame and
end frame;
Step6: you will get a bounding box on your viewport, that is your dancer's position;

Step7: If you want to dynamic preview your dancer's position during the animation, run MEL
command "rman genrib; " in your script editor. Then you will see the bounding box
moving in your Maya viewport;
Source Code
mocap_rman.py
mocap.rman
mocap_db.py
mocapRI.mel
maya_proj_utils.py
mocapUI.mel
Conclusion
To sum up, this project teaches me more about Mel, python and RIMel. It is very good opportunity for us to use this powerful tool to create 3D scene and learn how to deal with motion capture data. For python scripting, I know it is very famous language around the world and in many different areas. After this project, I understand why people love python, and I will spend more time to learn python scripting in next quarter. Although this is a basic project about python and motion capture, it gives us a view of motion capture technology. Now I am very interesting in this technology and planning to take the motion capture class in the future. I believe that will be a very interesting class.
For this quarter, I have learned much on scripting. No only on the programming language, I have also learned how to solve the CG problem using scripting. That is very important part of this class. In the future, to be an FX artist or TD is my career goal. I need to use this one or two years to build my skill in Mel and Python scripting. I know how important they are for FX artist and TD. Once you understand how to use scripting in Maya, Houdini or other kinds of 3D software, it is easier to do the thing what you want, especially in a complicated scene. Many Thanks to the professor.